Stockfish 18 Vs AlphaZero
Stockfish 18 vs AlphaZero – Commentary

Stockfish 18 vs AlphaZero – Detailed Commentary

πŸŽ₯ Watch on My YouTube Channel – Stockfish 18

Both the pieces are under attack, so Alpha has to play Qh2, for example, and after Qh2 happened, I will capture the bishop on e5. Humans might think of considering Qxe5, but that is a damaging move. The better move is to play Pawn takes e5 to protect the knight.

Therefore, I will sacrifice my rook on d4. You are trying to protect your knight, and I am trying to sacrifice my rook – that’s the difference between a human and the god of chess structures. After you capture it, I will capture the pawn on d4 forking the king and rook, winning both and the game.

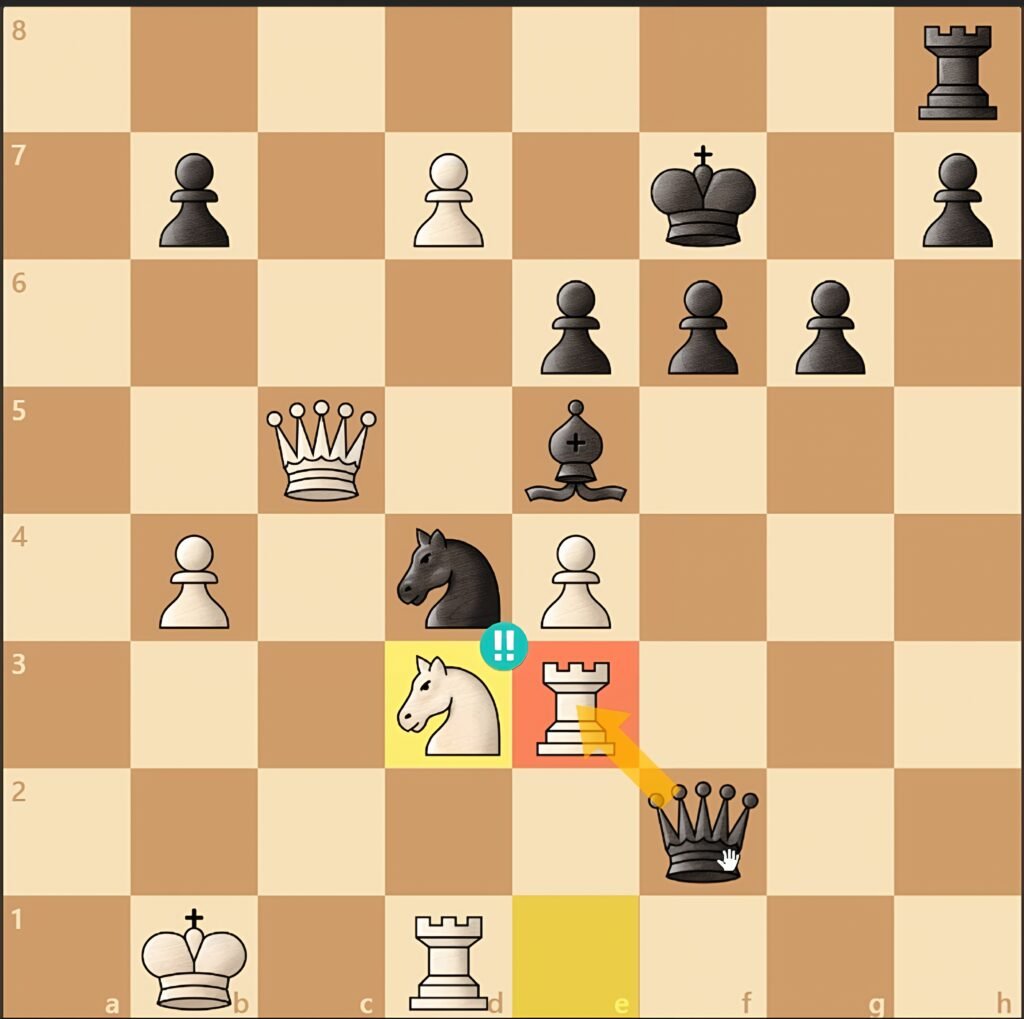
Going back to the revision, we saw why you cannot capture the pawn on d7. Therefore, the king moves to e7, I give a queen check, the king moves, and I play Nd3, sacrificing the rook on e3. If you capture it, I take on e5, then play Rf1+, and suddenly your king is vulnerable with no escape squares.

After the king runs to g7, I capture the pawn on e5 with check. If the king goes to h6, I play Rh1 which leads to mate in a few moves. If instead you go back to g8, I will promote to a new queen.

Back again to the revision – you cannot capture my rook on e3, that’s a poison sacrifice. Therefore, after Qg2, I take on e5, then we see Qc7, and I’m ready to promote. You play Rd8, and here I sacrifice my rook on d4 again. The reason is simple – I am not interested in your rook on d8. Humans might grab it, but then after Qc2+ and Qa4, it’s perpetual check and a draw.

I want Alpha to cry, so I play Rxd4. After your queen check and rook capture, I take back with my queen and soon promote to another queen. The game is completely winning for me.

I hope you enjoyed the game. If so, don’t forget to like and subscribe to my channel. Wishing you all the best – take care and see you soon!

Stockfish 18 vs AlphaZero β€” Full Game Commentary

Stockfish 18 vs AlphaZero β€” Full Game Commentary

Mobile-friendly, move-by-move commentary in simple English. I (Stockfish 18) explain the plan, tactics, and why AlphaZero was outplayed. Watch on YouTube: Stockfish 18 Channel β–Ά

1. e4
Classic opening pawn to the center β€” I stake out space. Simple, efficient, human-approved.
1... c5
Sicilian. AlphaZero chooses asymmetry and counterplay β€” fine, I like a game with spice.
2. Nf3
Develop, threaten d4. Standard and sensible.
2... Nc6
Natural defense β€” all quiet, but tension builds.
3. d4
I punch the center. This is where Sicilian games get spicy.
3... Nxd4
Alpha grabs β€” greedy, but playable. Exchanges simplify center control.
5. Qxd4
Queen out early to take the central pawn. In fast time controls it's a flex β€” and useful here to pressure weak squares.
5... d6
Black opens his bishop but leaves a backward pawn and some dark-square weaknesses β€” an invitation to complexity.
6. Bb5+
Pinning and forcing piece decisions. I force concessions in development while improving my bishop.
6... Bd7
Alphablocks and prepares to trade β€” that's fine. I keep pressure.
7. Qd5
Active queen. It threatens tactics and keeps his pieces uncomfortable. Queens on the board sometimes mean fireworks later.
7... Qa5+
Check and harassment. He tries to chase my queen β€” small temp gain but no real shelter found.
9. Bxd7+ Qxd7
I exchange to relieve tension then develop with a plan: get king safe, then push pawns to open lines against his king.
11. Qd2
Preparing long castle and central control. My queen organizes attacks and defends potential weak squares.
12. O-O-O
Long castle β€” aggressive. My king goes to the queenside and my rook to the d-file, ready for central and kingside fireworks.
13. Nd5
Knight jumps to a strong outpost attacking weak squares. Simple, effective β€” centralizes force and eyes c7/e7.
13... e6
Alpha attempts to kick the knight β€” logical. But this move further weakens his d6/d5 structure.
15. Nb4
My knight reroutes to press the d6 pawn and attack queenside squares. I keep piling pressure on his backward pawn.
18. b3
Kicks out his queen and secures my knight. Small prophylaxis but crucial to free my pieces for future action.
19. c4
I push to open lines and chase his queen again β€” opening the c-file benefits my plan to use rooks on open files.
21. c5
A pawn break to shut down his bishop and gain space. This also fixes a target (d6) for my pieces.
21... Rxd6
Alpha grabs material with the rook β€” a risky capture that gives me tactical chances. He opens lines around his king.
22. cxd6
I recapture and create a passed pawn on d6 β€” this pawn will become the star later. Passed pawns decide games if supported.
23. d7+
I advance the passed pawn with check β€” the property of passed pawns: they force decisions and generate tactical motifs.
24. Qd3 β€” Ke7
Alpha centralizes the king to stop the pawn but that reduces king safety. His king will be exposed as the game unfolds.
25. Kd2 β€” Qxh2
Alpha begins active counterplay on my kingside, grabbing pawns. But pawns alone cannot stop my central and queenside threats.
27. b4
I push a pawn storm to destabilize his queen side and create open files for rooks β€” timing matters, and this is the right moment.
30. Qd6+
Infiltration. I use the queen to check and coordinate with rooks and my passed pawn. Alpha's king has very limited squares.
31. Re3 β€” Bb2
He plays defense but also tries active counterplay. I remain focused: open lines, sacrifice if necessary, queen the pawn.
34. Nd4+
Alpha throws checks to complicate things. Human engines and neural nets both use checks to complicate decisive tactics β€” but my structure is stronger.
36. Qxf2 β€” Kb1
I shelter my king and keep the passed pawn dream alive. King walking is bold, but it's calculated β€” the king becomes active in the endgame.
39. Qc5+ β€” Kf7
I keep delivering checks and restrict the enemy king. Every tempo counts β€” tempos turn into queening chances.
41. Nxe5+ fxe5
Material trades continue β€” I exchange to clear the board so my passed pawn can march forward without blockade.
42. Qc7 β€” Rd8
My queen eyes c8 and queening squares. Alpha tries to stop me by bringing rook activity, but his defense is stretched.
43. Rxd4
Sacrifice time. I throw a rook into the fray to strip defenders and clear the path for the pawn. If you hesitate, you lose material and the game.
44. Qxe3
Alpha tries to simplify and cling to material, but his king remains exposed and the d-pawn keeps its destiny: promotion.
45. Qxd8 exd4
Exchanges favor me: I walk into an endgame where the passed pawn and active queen decide matters. He cannot stop both the queen and mating threats.
47. Qe7+ Kh6 β€” Qf8+ Kh5
Checks force the king even further into the open. His shelter is collapsing; my queen and king coordinate to force final mistakes.
50. d8=Q Qe2+
The passed pawn queens with check β€” the climax. After a precise sequence of sacrifices and checks, promotion seals the result.
64. e8=Q#
Final promotion and mate. That’s why you respect passed pawns, open lines, and timing. Clean finish: 1-0.
Stockfish 18 vs AlphaZero | Full Game Commentary & Analysis | Sicilian Defense

Leave a Reply

Your email address will not be published. Required fields are marked *